 Do you have a USB flash drive laying around? Speed up your Windows Vista with the ReadyBoost feature. It allows you to use that spare space on a USB stick reduce wait time when using Vista.
Basically Windows ReadyBoost allows Vista to use a compatible USB flash drive as cache instead of the hard drive. Microsoft suggests that you provide enough space on a flash drive for ReadyBoost so that you are in at least a 1:1 ratio with your installed physical RAM. So if you have 1Gig of Ram installed, would be best ot have a 1Gig USB drive, or at minimum 512Meg free of space on it. ReadyBoost works best on systems that have little physical memory. This menas that if you are running a Windows Vista system with the minimum 512 Megs of rafm you would notice a difference by using Readyboost. The more physical Ram you have installed the least impact readyboost would have. So I do not recommend using ReadyBoost of system witl more than 2 Gigabytes of RAM installed.
Without getting too picky if you have a really old USB drive, see if you can find out the specs for it, it is recommended that the USB drive you have be at least:
PCWizKid tested the PNY 2GB Attache USB Flash Drive
Here are some suggestions on compatible Readyboost Flash drives
Steps to enabling ReadyBoost
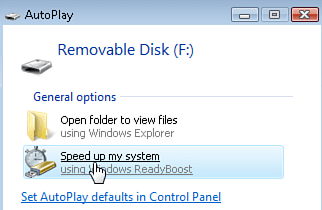
1. Insert the USB drive into one of your computer's USB ports. The AutoPlay dialog box opens a few seconds after plugging the drive in asking you what you want to do. Click "Speed up my system".

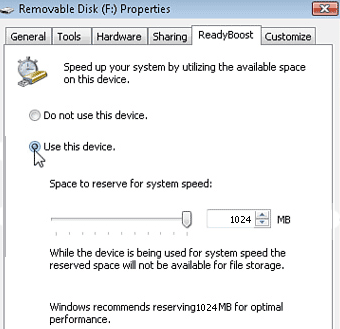
2. A new screen will appear showing the ReadyBoost properties. Select the "Use This Device" option. Then use the slider labeled "Space to reserve for system speed" to reserve the amount of space you would like to assign to ReadyBoost. Use 100% of the USB sticks space if you can.
 3. Click on the Apply and then the OK buttons to finalize the changes. The USB flash drive is now reserved as your ReadyBoost device and will be used as additional cache memory. Just remember to keep the USB stick plugged into the USB port on your PC when it boots up so Vista can detect and use it. You should notice a significant speed boost since accessing the flash drive is faster than accessing the hard drive.
 Note: You can verify that ReadBoost was setup on the USB Stick by opening the drive. You will see a file called ReadyBoost and it will have a file type description of ReadyBoost Cache File. The size of the file will also be the same as what you allocated towards ReadyBoost.
In conclusion
A quick benchmark test with PCMark 05 showed that there is a slight improvement in performance by using ReadyBoost. The base system test performed in PCMark 05 was the defaults and it gave a score of 2105 without using ReadyBoost. When the USB flash drive with ReadyBoost was used the PCMark 05 score was 2205. A small improvement, but there is a slight difference which proves that to extent this may not be as noticable as it seems.
Also keep in mind that you can only have one active ReadyBoost usb drive per system.
Other Tips Users have watched
- Top 10 Free Downloads to improve and tweak your Windows Vista
- Memory Upgrade for Windows Vista
- Boot Up Windows Faster
- Enabling Remote Desktop from XP to Vista
- Free Windows Cursor Themes - with CursorFX 2.0
- Windows Vista PowerToys - Tweaks from Microsoft TechNet
- Get Ubuntu (Linux) to look like OS X Leopard!
- Speed up your Windows Search
- Free Up windows resources which are slowing you down
- Customize Windows Send To (right click menu items)
- How to Change to Owner Name in Windows
- Customize your Windows Explorer View
- Disable User Account Control Popups
