
Did you know that Windows Vista has a free screen capture tool? Its called the Snipping Tool. The Snipping Tool allows you to take full or partial screen captures of your windows or desktop and save them as snippets of images on your computer. Though this is a basic screen shot tool its quite powerful since it has the capability to allow custom portions of your screen to be captures and even included a few editing options.
If you are looking to take screen shots and snippets of your desktop/screen, follow my video tutorial which steps you through using the Snipping Tool.

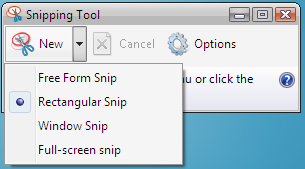
The capture methods that can be used to take snips are free-form, rectangular, window, and full-screen.
IMPORTANT NOTE:
The Tablet PC Optional Components feature must be enabled for the Snipping Tool to be available on your computer. If you need to enable this Window feature please see my video tutorial for Tip #12 [Watch the video] Once enabled you will be able to use the tool.
The Snipping Tool Options
Application Options:
Hide Instruction Text
When selected, hides the instruction text in the main Snipping Tool window.
Always copy snips to the Clipboard
If this is enabled it will copy all snips to your Windows clipboard so you can paste them into another application such as word processors or other image manipulation programs.
Include URL below snips (HTML only)
With this enabled if you save your snip as a Single File HTML, or MHT document, and the snip was taken from an Internet Explorer browser window it will show the url of the page that you took the snip from.
Prompt to save snips before exiting
When selected, when you exit the snipping tool it will prompt you to save any snips that were created.
Display icon in the Quick Launch Toolbar
When enabled an icon for the Snipping Tool will be placed in your Quick Launch Toolbar.
Show screen overlay when Snipping Tool is active
When selected, when you are creating the snip the Snipping Tool interface will disappear.
When enabled the selection border will be shown, using the color selected in the Ink Color option, around the snip.
Different selection types that you can use to take a snippet.
Free-form Snip.
Draw an irregular line, such as a circle or a triangle, around an object.
Rectangular Snip.
Draw a precise line by dragging the cursor around an object to form a rectangle.
Window Snip.
Select a window, such as a browser window or dialog box, that you want to capture.
Full-screen Snip.
Immediately capture the entire screen when you select this type of snip.

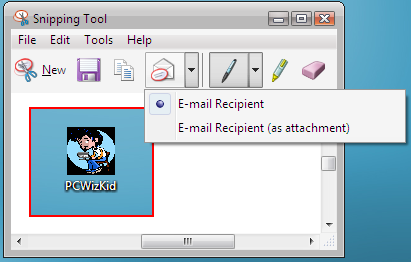
Save it or Send it
Once you have taken your screen capture to save just use the File menu or the Save As button enter a name for the snippet chose a location to save on your PC and click Save. Optionally you can send the snip by e-mail also by clicking the Send Snip option.
Other Tips Users have watched
If you are looking to take screen shots and snippets of your desktop/screen, follow my video tutorial which steps you through using the Snipping Tool.
The Snipping Tool allows you to capture your screen using four methods and then save these snips as a JPG, GIF, PNG, or MHT file. |
IMPORTANT NOTE:
The Tablet PC Optional Components feature must be enabled for the Snipping Tool to be available on your computer. If you need to enable this Window feature please see my video tutorial for Tip #12 [Watch the video] Once enabled you will be able to use the tool.
The Snipping Tool Options
In the Snipping Tool the "Options" button has various preferences on how you want to manage your captures. |

Hide Instruction Text
When selected, hides the instruction text in the main Snipping Tool window.
Always copy snips to the Clipboard
If this is enabled it will copy all snips to your Windows clipboard so you can paste them into another application such as word processors or other image manipulation programs.
Include URL below snips (HTML only)
With this enabled if you save your snip as a Single File HTML, or MHT document, and the snip was taken from an Internet Explorer browser window it will show the url of the page that you took the snip from.
Prompt to save snips before exiting
When selected, when you exit the snipping tool it will prompt you to save any snips that were created.
Display icon in the Quick Launch Toolbar
When enabled an icon for the Snipping Tool will be placed in your Quick Launch Toolbar.
Show screen overlay when Snipping Tool is active
When selected, when you are creating the snip the Snipping Tool interface will disappear.
Selection Options:
Ink Color:
This will change the color of the selection border when you create a snip.
When enabled the selection border will be shown, using the color selected in the Ink Color option, around the snip.
Different selection types that you can use to take a snippet.
Free-form Snip.
Draw an irregular line, such as a circle or a triangle, around an object.
Rectangular Snip.
Draw a precise line by dragging the cursor around an object to form a rectangle.
Window Snip.
Select a window, such as a browser window or dialog box, that you want to capture.
Full-screen Snip.
Immediately capture the entire screen when you select this type of snip.
Save it or Send it
Once you have taken your screen capture to save just use the File menu or the Save As button enter a name for the snippet chose a location to save on your PC and click Save. Optionally you can send the snip by e-mail also by clicking the Send Snip option.
 |
Watch my Video Tutorial for step by step instructions.
Other Tips Users have watched
- Customize Windows XP to look like Vista
- Top 10 Free Downloads to improve and tweak your Windows Vista
- Boot Up Windows Faster
- Enabling Remote Desktop from XP to Vista
- Windows Vista PowerToys - Tweaks from Microsoft TechNet
- Get Ubuntu (Linux) to look like OS X Leopard!
- Speed up your Windows Search
- Free Up windows resources which are slowing you down
- Customize Windows Send To (right click menu items)
- How to Change to Owner Name in Windows
- Customize your Windows Explorer View
- Disable User Account Control Popups